You may have heard the term Quine before… It means a program which prints its own source. For example in python:
$ cat quine.py
s='s=%r;print(s%%s)';print(s%s)
$ python3 quine.py
s='s=%r;print(s%%s)';print(s%s)
A sort of self-referential fractal poetry… the output of the program is itself…
However a Hash Quine takes this a step further. Rather than printing its own source, the Hash Quine prints or displays its own Hash, a cryptographic trace of its own identity.
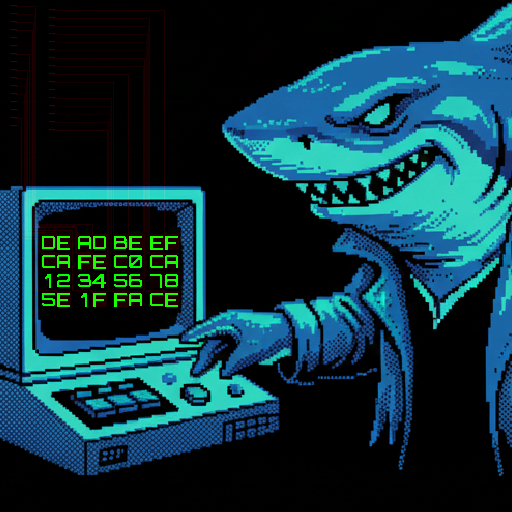
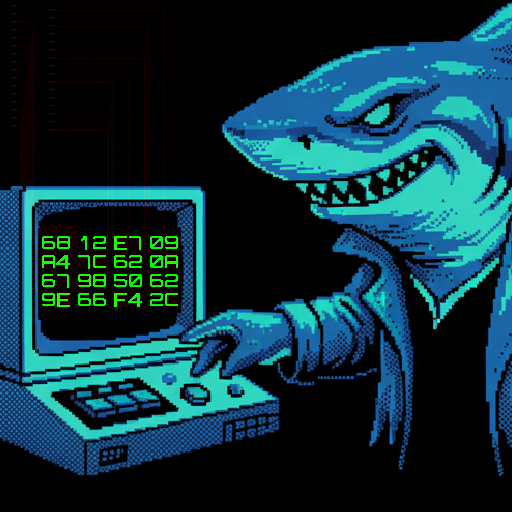
By the end of this post, you will learn how I created the following image, which displays its own MD5 Hash! Here it is now:
$ md5sum shark_hashquine.jxl
c0dec0007b5246f7428936d9bed2f446  shark_hashquine.jxl

NOTE: Your browser does not support JPEG XL!
If
you want to verify the hash, either try a browser that does (safari), or
download the .jxl file
The
image above is a PNG render which does not have the same MD5
properties
You have likely computed a hash before. It is a seemingly mundane string of numbers which is the result of passing the entire file through a one-way function. In a real way, this calculation can represent the soul of the file in as much as the source itself does.
$ md5sum ./my-cool-file.pdf
6cef0cf6194efa36cb5be483ce87bd3b   my-cool-file.pdf
Now the fun thing about a hash is you can do it to any file, anything at all! So by making a Quine print its own hash we open up the Quine Cinematic Universe (QCU) to all other file formats.
By doing so we also learn new mediums with entirely different computational paradigms. After all, what is an image other than a program which runs inside of a graphic codec runtime…
So, to learn more, let’s create an image which can display its own MD5 Hash!
Finding a fixed point where the file displays its own hash sounds impossible! You can imagine that every time you change the file to display one hash, the hash of the file changes again!
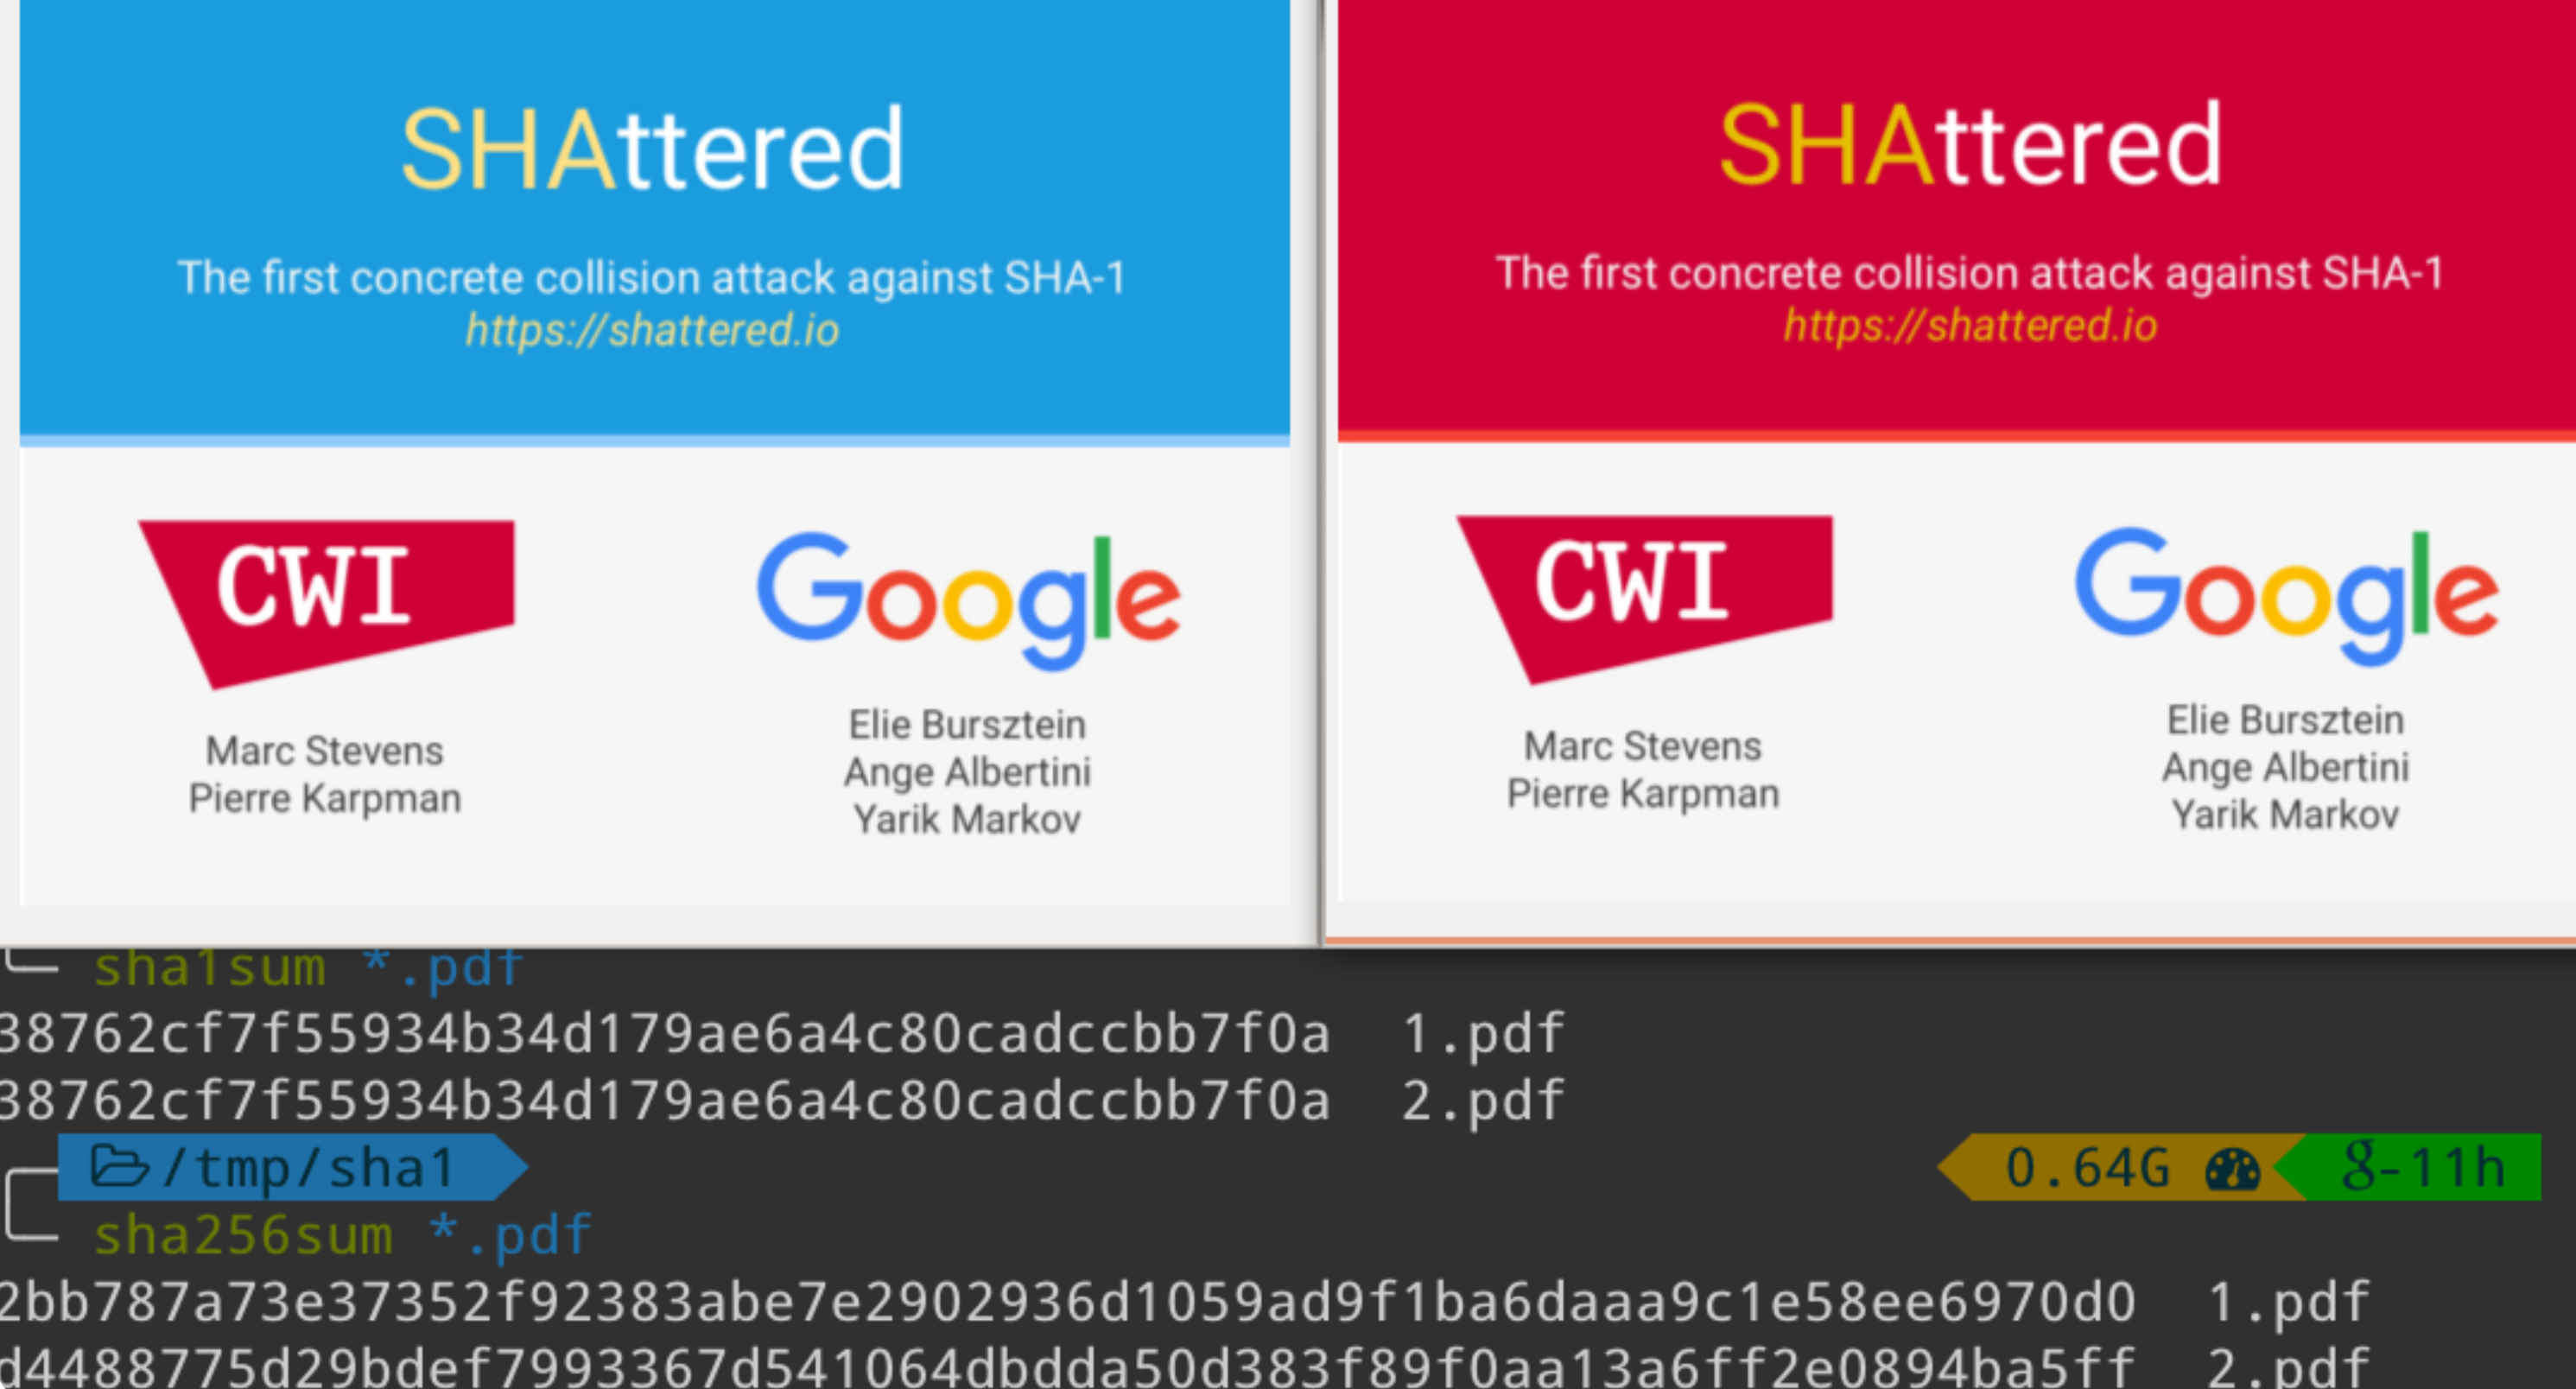
However, this is not a new field, and I am not the first to have attempted this… In fact there have been many other impressive Hash Quines across a variety of file formats
You can find a big list of them here: github.com/corkami/collisions
The proof lies in these very files, you can download them and hash them for yourself to verify! It clearly is possible to produce such artifacts. In fact this last PNG one, (which was a beautiful piece of work, please read the detailed writeup here), is exactly what we are looking for.. but that is not reason to be satisfied or give up on creating our own!

So why attempt to create a new one? Well every file format is unique and different, bringing new challenges to overcome and new avenues of attack to try out. There are plenty of image formats left to tackle beyond PNG!
To make it even more interesting and novel, we can also add some additional constraints..
The length field hack is actually how the only public SHA-1 collision files work. Two PDFs which have different length fields, causing different objects to render. (This attack cost an estimated ~$2.7M to pull off btw)
With these constraints in mind, we can get started. But where to start? Even when we have proof in hand that this task is feasible, it still seems intractable to produce a file which displays its own MD5 hash!
Well from a pure mathematical stance it is technically possible… as the space of possible hashes (128 bits for MD5) is much smaller than the space of all possible images displaying hashes. You would expect that with enough time you would be able to brute force and locate such a file…
However, even if you hashed with the speed of the entire bitcoin network (currently 1.2 zettahashes per second), it would be expected to take 4.5 billion years!
We want to get this done in a weekend! Rather than brute force 128 bits, MD5 hash quines generally abuse cryptographic weaknesses of the MD5 hash itself. In particular we will make use of the “Identical-Prefix Collision” attack.
If you are familiar with hashing, you should know that at this point in time, MD5 is considered a broken hash. This is particularly true when we consider its collision resistance.
The collision resistance of a hash is determined by how difficult it is to find any two inputs which result in the same hash output. You should expect that a cryptographically secure hash function makes it computationally infeasible to find two such inputs.
However as computing power and understanding of hash functions increases, functions which were previously thought to be resistant have fallen to this attack. This is what will make our task possible to do in a reasonable amount of time.
To do this we will be using a tool called fastcoll, created by Marc Stevens.
You can even do it in a few seconds right here in your browser! Just push the “Generate MD5 Collision” button below:
Beyond just creating two inputs with the same hash, the technique used here can be done in an Identical Prefix attack. You can read more about the attack here.
In this setup we can provide any starting input data, which we can then extend with 128 byte colliding data blocks.
What’s more, due to the nature the MD5 hash function, it is merkle–damgård, once we have a collision after some point in the message, we can append the same suffix to both and preserve the collision. Here is an example with both a prefix and a suffix (bitflips highlighted in red):
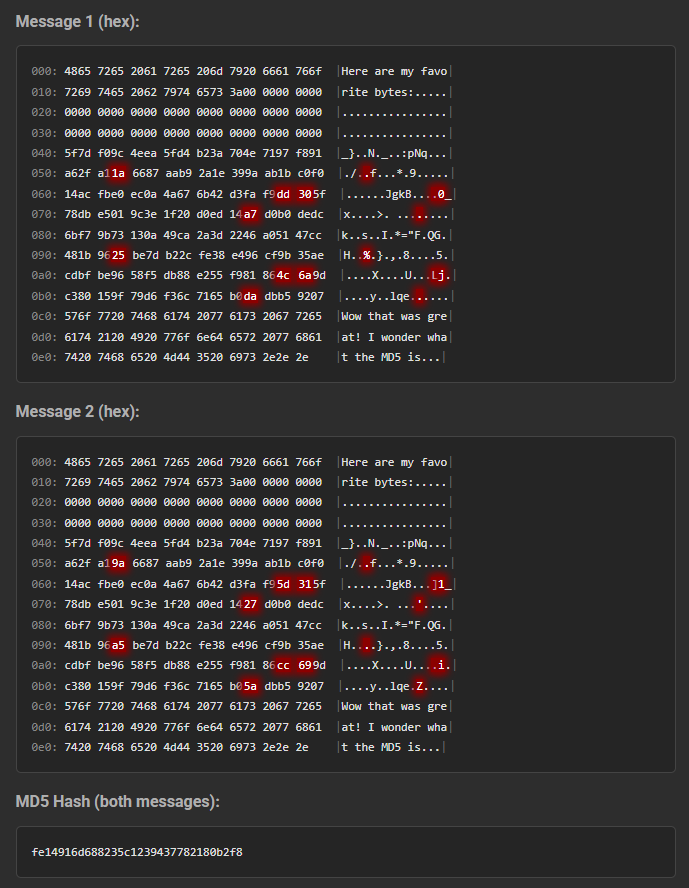
With this setup we can produce two files with identical hashes, which differ by a few bits somewhere in the middle!
This is the core capability used in MD5 hash quines to produce different effects from two files with the same hash…
Unfortunately producing colliding MD5 blocks is the easy part… we still have to be very clever about how we use these bitflips to conditionally render an entire 32 character string! Doing this depends heavily on the structure of the file format in question…
So knowing the core technique of this challenge, we now must choose an image format to take on!
For this task I decided to choose the JPEG XL file format. It is a very modern image format with many features.
It does have a slightly spotty history of implementation, but that seems to slowly be changing! As of right now it is supported in:
It also is now being included in the PDF standard, which may force adoption. As of a few days ago Chromium has signaled that they are interested again in including an implementation, likely one written in rust.
Personally, I have explored the JPEG XL spec before.
I have even created a Capture-The-Flag challenge which involves techniques very similar to some used here
https://github.com/Nautilus-Institute/quals-2025/tree/main/jxl4fun
If you want more to read after this, check out the writeup on that challenge!
https://blog.cykor.kr/2025/04/DEFCON-33-Series-jxl4fun-pwn

In particular, my favorite feature of the JPEG XL format is the lossless modular mode. In modular mode, each pixel in the image is rendered through the use of two components: a “Prediction Tree”, and a residual error stream.
You can think of the Prediction Tree as a small virtual machine with a few opcodes, which is executed on every pixel in the image. It can perform many branching conditional comparison operations, where values such as X and Y coords, adjacent pixels, and previous color channels. Then based on which branches are taken, a final opcode will output an integer color value for the input pixel.
This Prediction Tree alone is very powerful and can produce approximations of images with very few bytes. It is even used as a form of algorithmic art crossed with code golfing.
However to achieve full lossless encoding of detailed images, the predictions are only that, predictions of what pixels should be. To recover the full original pixel values, an error delta / residual value must be applied to the computed prediction value. These residual values are stored in the image in a compressed format.
pixel(x,y) = PredictionTree(x,y,...) + Residual[x,y]here is an example of what a simple prediction tree can render
Height 512
Width 512
Bitdepth 8
DeltaPalette

if x > 0
  if y > 100
    - W -80
    - Set 255
  if N > 150
    - Gradient -50
    - Set 0

if y > 100
  if W > 100
    - N +40
    - Set 200
  - W -30

if |W-NW| > 40
  if x > 150
    - Set 0
    - N +70
- Set 150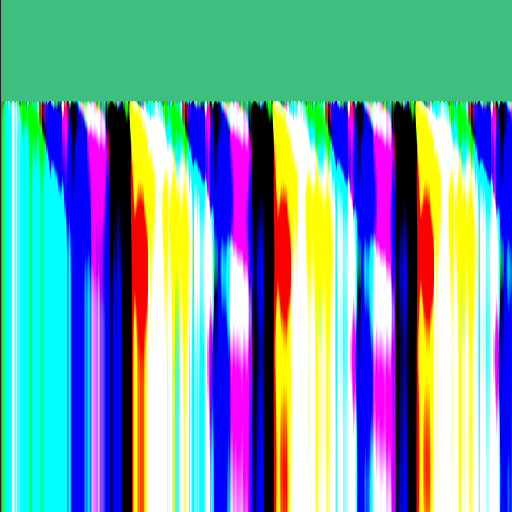
The prediction tree can also perform computation which resembles the capabilities of a Turing machine:
Width   1024
Height  1024
Bitdepth 8


if c > 1

 if y > 0
  if N > 250
    if W > 250
      - Set 0
    - Set 255
    if W > 250
      - Set 255
    if W > 60
     - W - 40
    if W > 10
     - W + 1
    - Set 50
 - Set 255

if c > 0

 if y > 96
  if N > 250
    if W > 250
      - Set 0
    - Set 255
    if W > 250
      - Set 255
    if W > 20
     - W - 40
    if W > 10
     - W + 2
    - Set 100
 if y > 95
  - Set 255
    if W > 20
     - W - 40
    if W > 10
     - W + 2
    - Set 100

 if y > 192
  if x > 97
  if N > 250
    if W > 250
    - Set 0
    - Set 255
    if W > 250
      - Set 255
    if W > 140
     - W - 60
    if W > 20
     - W + 2
    - Set 200
   if x > 95
  - Set 255
     if W > 140
     - W - 60
    if W > 20
     - W + 2
    - Set 200
 if y > 191
  - Set 255
     if W > 140
     - W - 60
    if W > 20
     - W + 2
    - Set 200
We will make heavy use of this computational power!
Now the inkling of a plan forms! We have two pieces to the puzzle through an image decoding mode which allows:
If this works out, we should be able to chain the bitflips across pixels into rendering hex digits elsewhere in the image!
The first major challenge we face is embedding the MD5 collision blocks into the residual data stream.
The main obstacle in our way is compression! JPEG XL is well known for its small file sizes and it partly achieves this through multiple layers of compression. Here is what matters for the residual stream:
The residual stream is made of “tokens”, where each token can be decoded to an integer value.
ANS Entropy encoding or Huffman Encoding
LZ77 compression over final bit streams
This can prove an issue because the MD5 Collision chunks are full of random bytes. If we were to try to naively swap out a chunk of a compressed JPEG XL file with these random bytes, it will fail to decode with an error!
Trying to find chunks which happen to decode correctly would greatly increase the difficulty of this task… so how about we bypass all these compression steps instead!
Luckily, at least for LZ77, we can simply choose to not enable it while encoding our original image. However the entropy encoding step is much more integral to the way the file format functions. There did not appear to be an easy on/off switch for that.
We won’t let this stop us! We just need a better understanding of how it works.
To perform Huffman Coding, first statistics are collected on all the tokens (pixel values, etc) in the data stream. A histogram is built to learn the distribution of the tokens. This histogram is then used to give preferential treatment to tokens which appear more often. A binary tree is built where each leaf is a token. The path from the root to a given token represents the encoded bit pattern.

This setup allows frequent tokens to be represented by a very small number of bits, while uncommon tokens can be much longer (even > 8 bits). You can see an example of the bit patterns for a simple image below. Notice how 0 is encoded with a single bit:
[DEBUG] Huffman codewords:
[DEBUG]   symbol   0: depth= 1 bits=0x0000 (0)
[DEBUG]   symbol   2: depth= 5 bits=0x0007 (00111)
[DEBUG]   symbol   3: depth= 5 bits=0x0017 (10111)
[DEBUG]   symbol   7: depth= 5 bits=0x000f (01111)
[DEBUG]   symbol  15: depth= 5 bits=0x001f (11111)
[DEBUG]   symbol  32: depth= 3 bits=0x0003 (011)
[DEBUG]   symbol  46: depth= 2 bits=0x0001 (01)
This presents an issue for our need to decode random bytes -> tokens. Random bytes will contain a random number of tokens (as tokens have variable length). This causes the decoder to miscount and fail to decode the image with an error.
Ideally, to make this work, we would need to have it so that each random byte maps to some token. This way no matter what random bytes we use, each byte will successfully decode into a valid token and some value for the pixel.
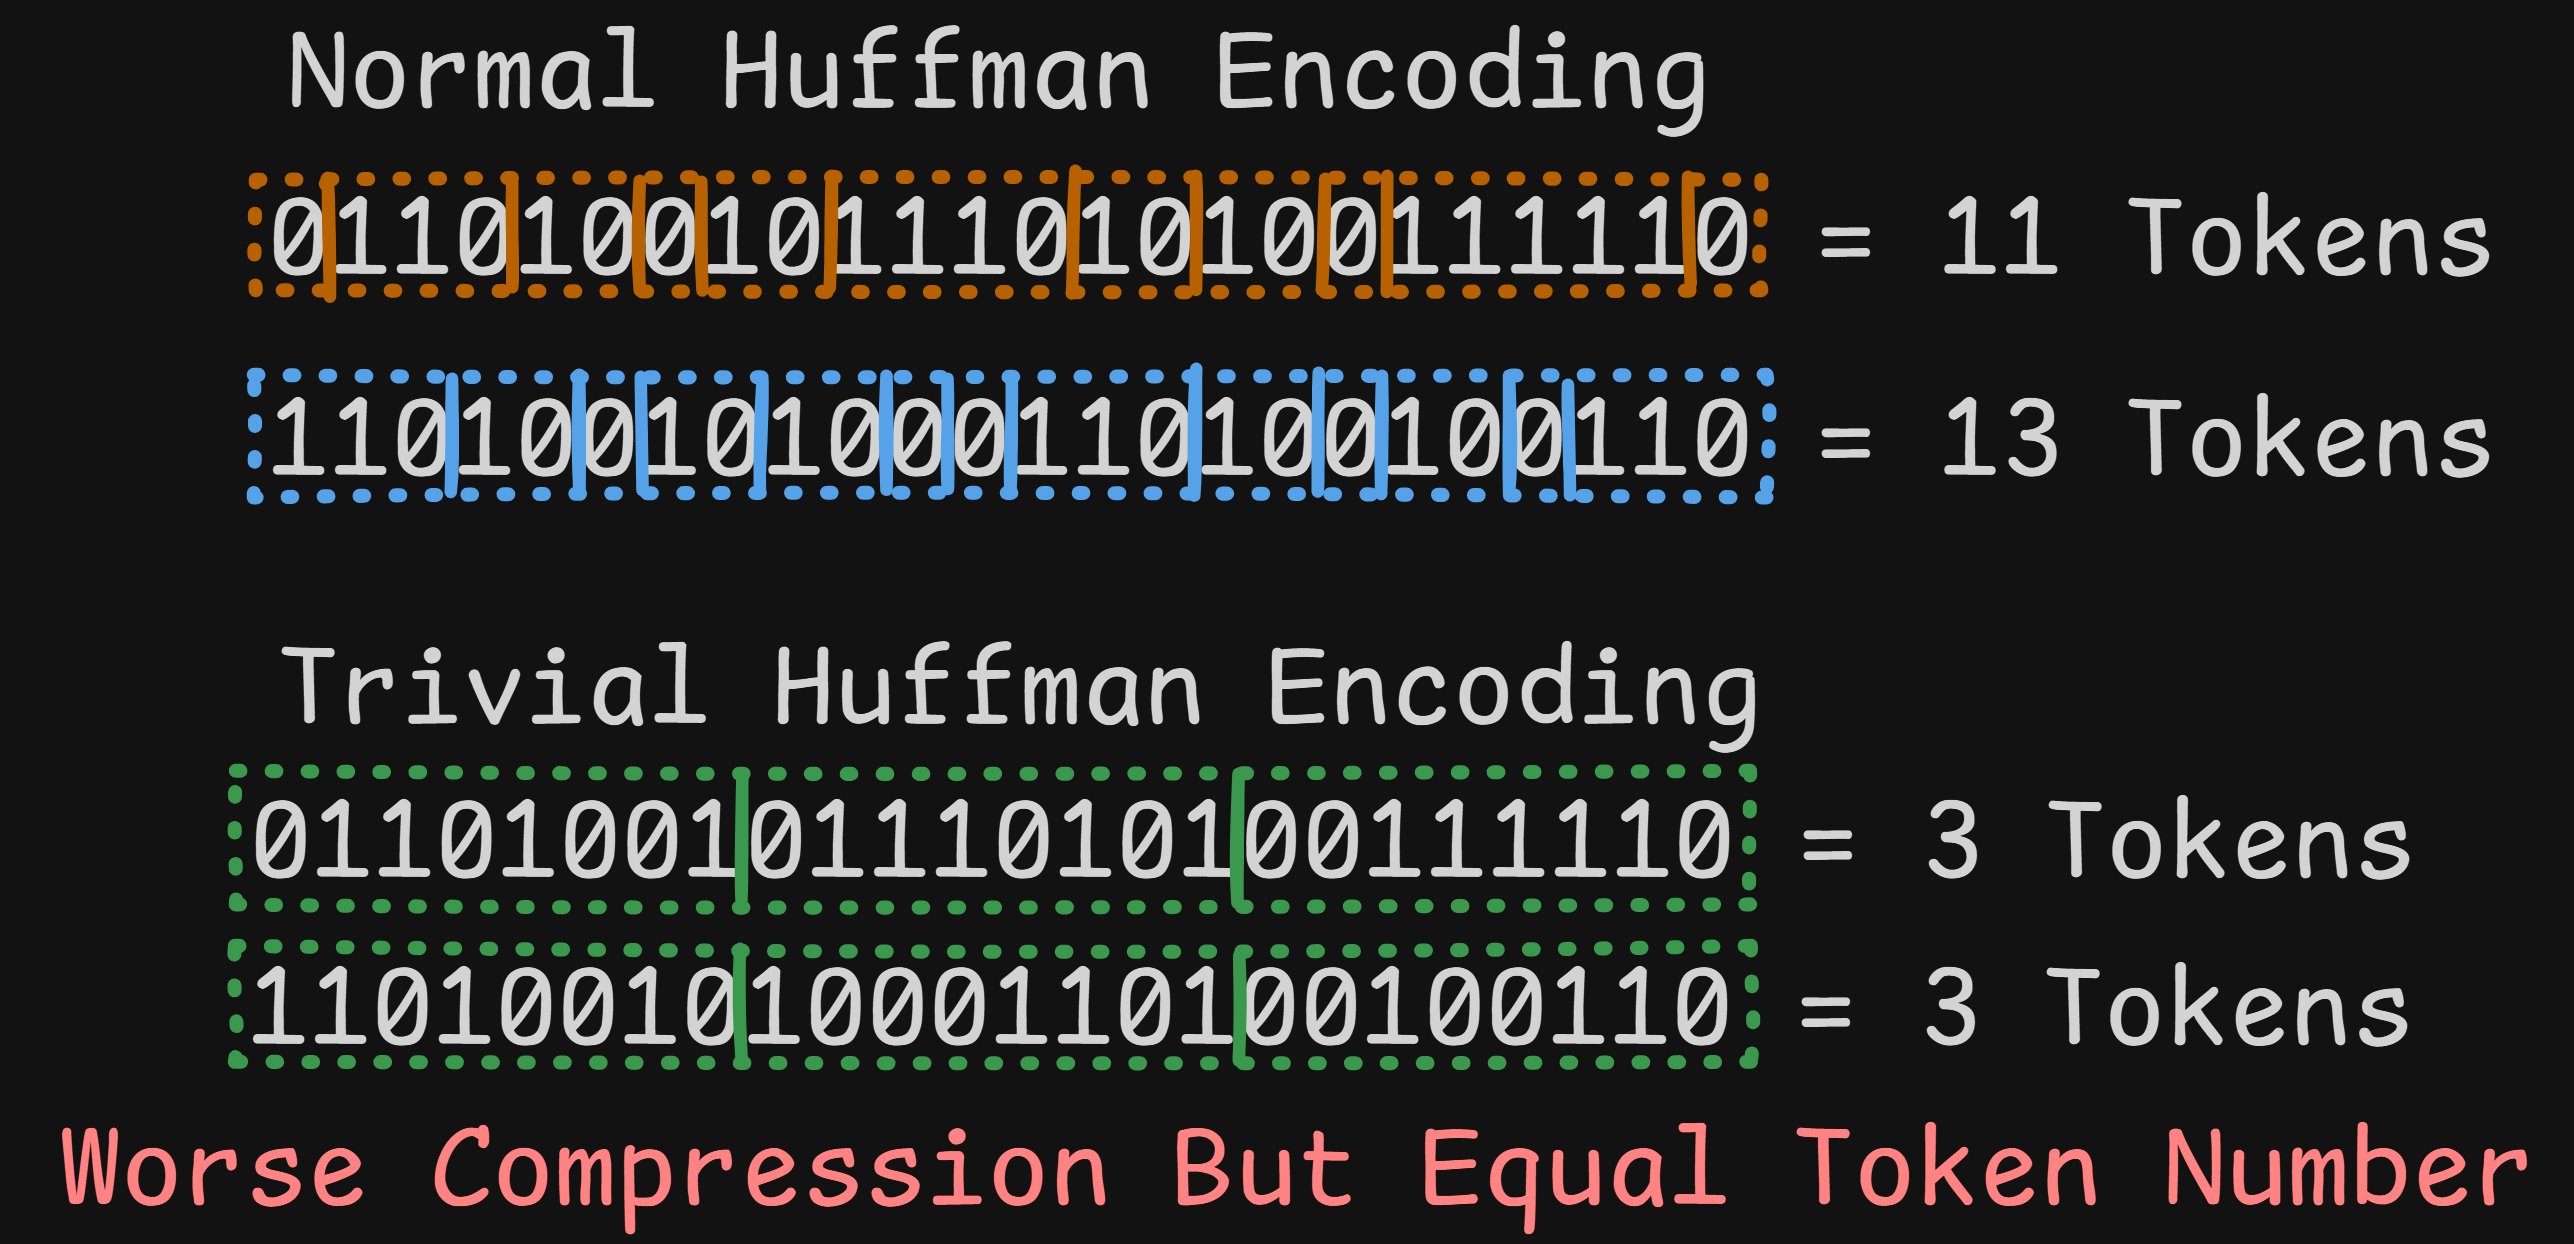
To construct this ideal histogram during encoding, we will modify the libjxl library encoder itself. We change the code to override the normal Huffman histogram calculations and make it think we have an even distribution of every possible 256 byte values.
We choose a histogram over 256 symbols so that the huffman builder emits a full 8-bit code with one symbol per codeword, effectively making the residual stream a raw byte stream from the decoder’s perspective.
+    // When set, ignore actual frequencies and force all symbols to have count=1
+    if (force_full_alphabet) {
+      fprintf(stderr, "[DEBUG] Forcing all 256 symbols to frequency=1 (ignoring actual token frequencies)\n");
+      for (size_t i = 0; i < size; i++) {
+        histo[i] = 1;
+      }
+    }
Even with this change, the resulting .jxl file is still spec compliant and can be decoded by the standard JPEG XL decoder.
After applying this change (and configuring a few things such as disable LZ77 mode) we get the following codes:
[DEBUG] Forcing all 256 symbols to frequency=1 (ignoring actual token frequencies)
[DEBUG] force_full_alphabet mode: size=256
[DEBUG] Huffman codewords:
[DEBUG]   symbol   0: depth= 8 bits=0x0000 (00000000)
[DEBUG]   symbol   1: depth= 8 bits=0x0080 (10000000)
[DEBUG]   symbol   2: depth= 8 bits=0x0040 (01000000)
[DEBUG]   symbol   3: depth= 8 bits=0x00c0 (11000000)
[DEBUG]   symbol   4: depth= 8 bits=0x0020 (00100000)
[DEBUG]   symbol   5: depth= 8 bits=0x00a0 (10100000)
[DEBUG]   symbol   6: depth= 8 bits=0x0060 (01100000)
[DEBUG]   symbol   7: depth= 8 bits=0x00e0 (11100000)
[DEBUG]   symbol   8: depth= 8 bits=0x0010 (00010000)
[DEBUG]   symbol   9: depth= 8 bits=0x0090 (10010000)
[DEBUG]   symbol  10: depth= 8 bits=0x0050 (01010000)
[DEBUG]   symbol  11: depth= 8 bits=0x00d0 (11010000)
[DEBUG]   symbol  12: depth= 8 bits=0x0030 (00110000)
[DEBUG]   symbol  13: depth= 8 bits=0x00b0 (10110000)
[DEBUG]   symbol  14: depth= 8 bits=0x0070 (01110000)
[DEBUG]   symbol  15: depth= 8 bits=0x00f0 (11110000)
[DEBUG]   ... (240 more symbols)
The end result is that every 8 bit pattern maps to a valid token. We can now swap in chunks of random bytes in the file and the image still successfully decodes!
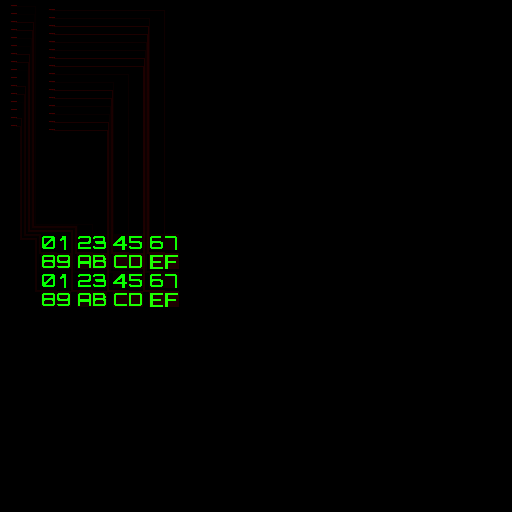
Next let’s verify that we can place the MD5 collision blocks into the image file. We can start with an image containing all 0 pixels, then replace parts of the image file on disk.
As a test, here we have found many MD5 Collision Blocks and inserted them into the black image file. We end up with two files with a few flipped bits between them. We can see that the MD5s match, while their SHA1s do not.
$ md5sum collide_*.jxl
711006dc2d914cf2ce1a0c914be263d0  collide_a.jxl
711006dc2d914cf2ce1a0c914be263d0  collide_b.jxl
$ sha1sum collide_*.jxl
7fa4db84031ef4558bfa85447b8fa96cf80e203d  collide_a.jxl
e05383faf062e6f749a0dbc78de8065b64c45d59  collide_b.jxl
Can you see the changed pixels?
Here is a flip-card:
We can visualize just the bits which have been flipped by diffing the images:
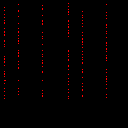
The key is that we can swap ANY of the collision blocks for their pair, allowing us to toggle any of the indicated bits in the image without changing the MD5.
Note: In the final image, we will hide these random collision bits by placing them in an alpha channel instead of red. The data is still rendered by the decoder, but is not visible in the final render.
The final piece of the puzzle will be: How can we convert these bitflips into a hex digit display?
To pull this off we need to construct these components into our prediction tree:
We have a very limited set of operations available. Here is a selection of useful ones:
Comparison operators (taking the form
if <prop> > <int>)
c: the channel number, where 0=R, 1=G, 2=B, 3=Ax, y: coordinatesN: value of pixel above (north)W: value of pixel to the left (west)Prev: the pixel value in this position in the previous
channelPrediction operators (returns the computed pixel value)
Set <int>: effectively sets the pixel value to
<int>W: value of pixel on the leftN: value of pixel aboveNW: value of topleft pixelGradient: Computes W+N-NW, clamped to
min(W,N)..max(W,N)You can find a mostly full list here: https://jxl-art.lucaversari.it/wtf.html
With these operators we can achieve all 4 goals!
When we swap out an MD5 Collision Block, one or more pixels within
that range will change. Luckily the N, W, and
Prev comparison operators allow us to compare pixels to a
fixed value.
We can choose a value (for example 64), and then search for Collision Blocks which swap from below to above this value.
For example a bit flip may cause a pixel to go from
20 -> 84, thus with one version of the block the
condition is false, and for the other the condition is true.
When the condition is true, we can output a pixel value of
2**N (for Nth bit in a hex character).

These make up our “Probes”. We need 128 probes to render the full MD5 hash.
The next step is to compute the actual 0-15 value for each set of 4 bitflips. This will make the later digit rendering much easier. So far we have the values 1,2,4,8 set based on which bit we flip on, so we just need to add them together.
While we just need an addition operator, there are actually very few pure arithmetic operators available. Most are weighted averages or other image rendering related operations.
The closest one is the Gradient which does a computation
of W + N - NW (each is a relative pixel value). It seems we
could use this if we set W to one bit value, N to another, and NW to
0…
BUT there is a catch! The Gradient is clamped, meaning
we cannot get a value larger than max(W,N)… so 1 + 2 ->
2
To make this work as addition, we need to increase this max value
above 15. Luckily, doing some simple algebra we find that it is possible
if we manipulate the W - NW to do the addition, and set
N to a value like 32.
Rather than using bit values B = 1,2,4,8, we will
instead use 32 - B so 31, 30, 28, 24. Then we
set N = 32, W = acc (accumulator across bits)
and NW = 32 - B. If you simplify:
acc + 32 - (32 - B) == acc + 32 - 32 + b == acc + b, and
the max(acc, 32) = 32, so we achieved our addition
operator!

We have computed our 4 bit sets, one for each of the 32 hex digits, and this value exists as a pixel. Now we need to get this value to the right digit location in the image.
This is actually very easy, as we can use the North and West operators to duplicate a previous pixel value. We simply need to draw some N/W “wires” from our bitflips to our digit locations. The only caveat is that this only can move down and right, so we will place the bitflips in the upper left corner of the image.
Here is what 32 wires looks like when rendered:
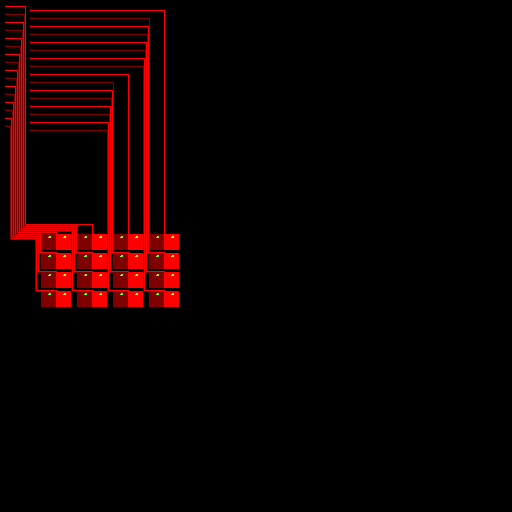
At the top of each wire is the bitflip Gradient addition
logic for 4 bits.
The final step! We have a “wire” with the correct hex value, now we just have to display it…
There are several ways you might do this, but for simplicity I took the easiest route: Build a giant prediction tree to conditionally output a value for each pixel in the digit.
To get the pixels, we pick a font (I chose Orbitron a nice font for digital numbers), render it as a bitmap of some size (15x15 here).
With this bitmap, we can then make a conditional tree which handles all 16 cases, such as the following:
if Prev > 15
  - Set 0
  if Prev > 14
    - Set 1
    if Prev > 13
      - Set 1
      if Prev > 12
        - Set 0
... etc ...
With this in place, each digit renders based on the value of 128 pixels in the upper left corner of the image!
Almost at the finish line!
Before we do the final “render”, let’s give the image some extra flare. We can inject some nice graphics into the rest of the residual pixels. I chose a cyber shark because why not…
Now the final steps:
jxl filejxlOnce everything is in place we have a final jxl image
file and a set of 128 pairs of blocks…
Using a script we can swap these blocks in at will to encode any 128 bit pattern we like!
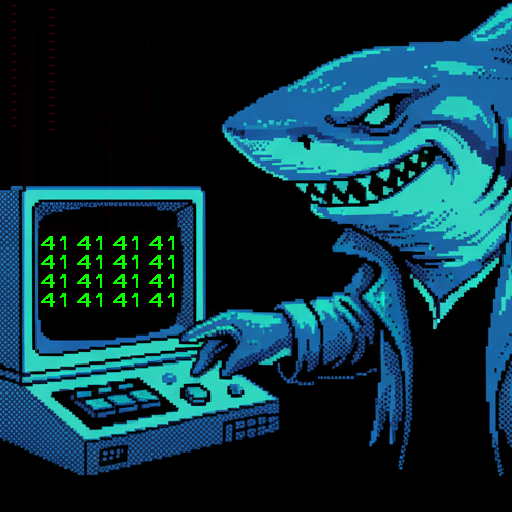
The images above are PNG renders which do not have the same MD5 properties
$ md5sum with_*
6812e709a47c620a679850629e66f42c  with_41414141.jxl
6812e709a47c620a679850629e66f42c  with_deadbeef.jxl
6812e709a47c620a679850629e66f42c  with_md5.jxl
We have done it!!! We have produced a JPEG XL image which displays its own MD5 Hash!
As a final touch, we can hide some leet speak inside the hash.
Any data we change after the last MD5 Collision Block will change the final MD5 hash, but the image will still function as expected. We can simply brute force changes to the last bytes in the file until the hash appears how we want.
For my final image, I chose to start the md5 with
c0dec000 (since we are abusing such an expressive image
codec). It took about 2-3 min on my laptop to brute force the 32-bits in
rust and locate a hash starting with this.
And so the final image is now complete!
$ md5sum shark_hashquine.jxl
c0dec0007b5246f7428936d9bed2f446  shark_hashquine.jxl
NOTE: Your browser does not support JPEG XL!
If
you want to verify the hash, either try a browser that does (safari), or
download the .jxl file
The
image above is a PNG render which does not have the same MD5
properties
This was a very fun project which further increased my understanding of the litany of features JPEG XL provides.
Creating a Weird Machine inside a predictive image decoder opens a world of possibilities for strange and wonderful images.
I do hope that JPEG XL support will become widespread soon. Safari is ahead of the game here, and chrome/firefox need to catch up!
As for the final image, there are a few things I perhaps would like to improve for a future version:
The image size is ~2mb. This is mostly caused by the lack of compression due to our trivial huffman tree.
I believe this size can be greatly reduced by limiting which channels have this tree applied, removing a huge number of uncompressed null bytes.
The prediction tree was massive. The final version compiles to > 90000 nodes. I actually had to add additional channels to the image so the decoder would allow it!
The majority of this comes from the digit rendering. The naive tree creation algorithm can be improved for sure.
I also want to try out the “patch” feature of JPEG XL. This may allow us to render an entire digit in one go. The main difficulty is conditionally selecting the patch.
Thank you for reading!
If you are inspired, maybe think about some of your favorite file formats and see if you can make your own Hash Quine!
Every file format lives in its own unique computational world.